
How to Smooth Face, Whiten Skin & Blur Background in CapCut
Hello guys! How are you doing? In today’s tutorial, I’ll show you how you can take a simple, normal video and completely transform it inside the CapCut application. We’ll cover how to smooth your face, whiten your skin tone, and even blur the background. After applying these edits, you’ll notice how professional and premium your video looks — almost like it was shot in a studio with DSLR lighting. So, stick with me till the end.
Step 1: Install CapCut and VPN
First of all, you need the CapCut app installed on your device. If you don’t have it yet, just search for it on the Play Store or App Store and install it. Sometimes, depending on your region, you may need a VPN to use CapCut smoothly. Install a reliable VPN, connect it, and then launch CapCut.
Download CapCut from Play Store
Check out NordVPN for secure connectivity.
Step 2: Create a New Project
Once CapCut is open, tap on New Project and import your video. If you play it, you’ll see it looks totally normal — no background blur, no face smoothing. Let’s change that!
Step 3: Blur the Background
To make your video look cinematic, blurring the background is a great trick. Here’s how:
- Tap on your video clip.
- Select the Filter option.
- In the search bar, type Focus. This filter will blur your background while adding a beautiful blue-yellow color grading.
- If you want another option, search for Bokeh. This one also blurs the background and enhances color tones, making your video look even better.
Pro Tip: Apply either Focus or Bokeh depending on which looks best for your video style.
Step 4: Smooth & Retouch Your Face
Next, let’s enhance the face. Here’s how you do it:
- Tap your video and go to the Retouch option.
- Click on Face. CapCut usually detects faces automatically. If it doesn’t, zoom into the face area before retouching.
- Now apply the following tools:
- Smooth: Increases smoothness for a flawless skin look.
- Clear: Removes pimples, dark spots, or blemishes.
- Plump (Optional): Makes skin look softer and healthier.
After this step, you’ll notice a huge difference between the before and after.
Step 5: Whiten Skin Tone
If you want your skin to look brighter or fairer:
- Go to Skin Tone and adjust the pink/white slider.
- Use the Whitening tool to increase brightness further.
Be careful not to overdo it — keep the edit natural for the best results.
Step 6: Final Retouching
Before saving, do a quick final adjustment:
- Brightness & Brilliance: Adjust lighting for balance.
- Contrast, Sharpen & Clarity: Make the video look crisp.
- Saturation & HSL: Tweak colors for vibrance.
- Temperature & Vignette: Add final cinematic effects.
With these adjustments, your video will look like it was shot on professional equipment.
Step 7: Export in High Quality
Once you’re happy with the edits, click on Export, select the maximum resolution, and save it to your device. Now you have a high-quality, professional-looking video!
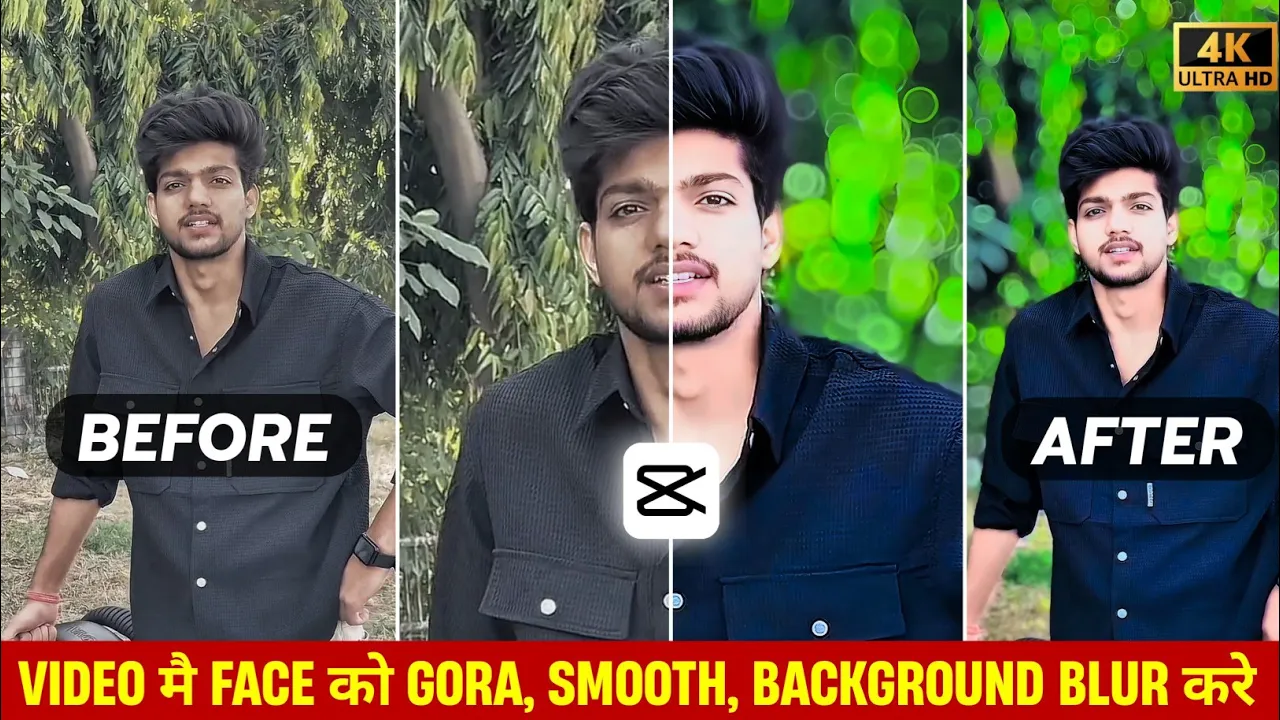
Before vs. After Results
The transformation is truly amazing. A plain, simple video is turned into something that looks premium and polished. The difference between the before and after is literally like night and day!
Final Thoughts
I hope you now understand how to use CapCut to blur backgrounds, smooth faces, and whiten skin tones. This editing method is quick, easy, and gives professional-level results without expensive cameras or lighting setups.
If you want to learn more about editing and AI-powered tools, check out these useful resources:
That’s all for today’s tutorial. See you in the next video editing guide. Stay happy and keep spreading happiness!