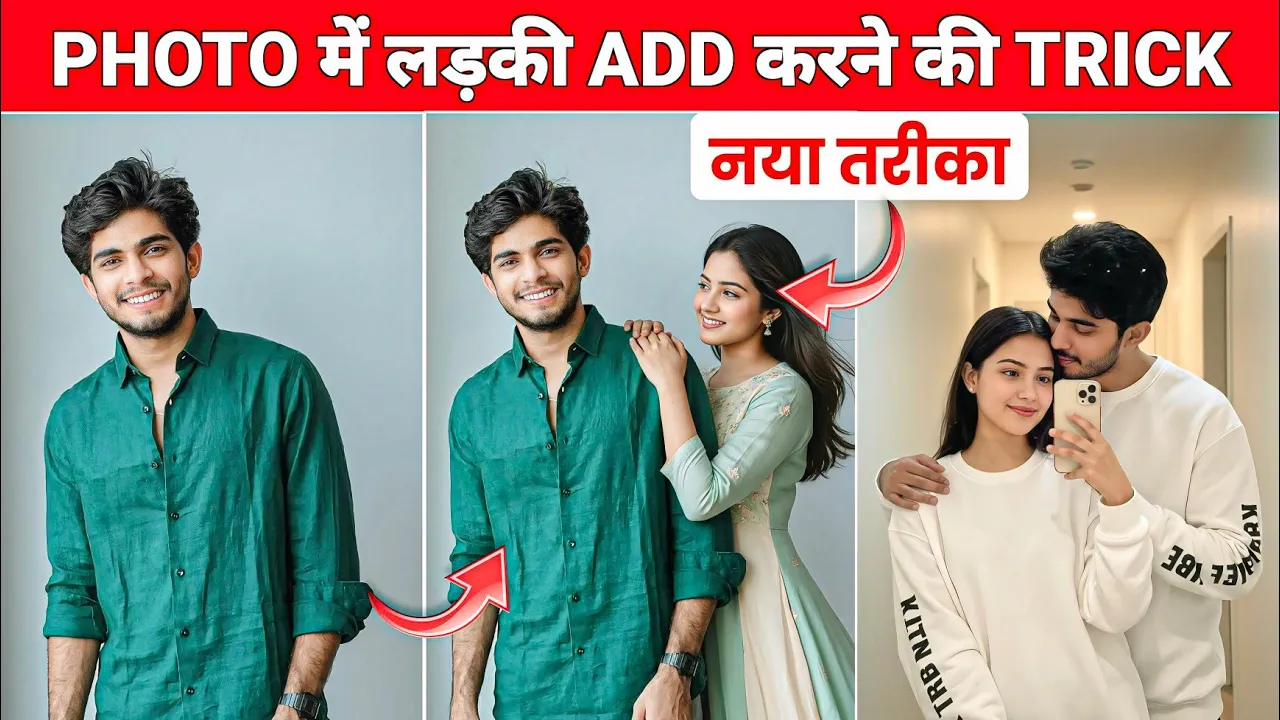
How to Add a Girl to Your Photo Using AI Photo Editor (Step-by-Step Tutorial)
Hey guys! In today’s tutorial, I’ll show you how you can easily add a girl into your photo using an AI photo editor. With this trending editing method, you can create stunning and realistic photos that look completely natural. So make sure to like this post and subscribe for more creative photo editing tricks. Let’s get started!
Step 1: Open the AI Photo Editor Website
First of all, open your browser and search for “AI Photo Editor Anup Sagar”. You’ll find a link to the official website that provides multiple trending AI photo creation tools. Click on the link to visit the site.
Once you’re on the website, you’ll notice several new AI prompts and trending templates that can be used to generate different photo styles. You can experiment with these templates to make creative photos for social media or your personal portfolio.
👉 Try some popular AI photo tools like Playground AI or Bing Image Creator for even more photo generation options.
Step 2: Search and Select the Right Prompt
Now scroll down the page until you find the section with AI prompts. Look for a prompt that includes adding a girl or female character to your image. Once you find it, copy the entire prompt shown below the image. This will help guide the AI on what kind of photo you want to create.
After copying the prompt, click on the button that says “Create Your Photo.” If you haven’t logged in yet, you’ll need to sign in to your account. Once you’re logged in, you’ll be able to upload your own image.
Step 3: Upload Your Photo and Add the Girl
Now it’s time to upload your photo. You can either use just one photo or combine two photos together. For example, if you already have a photo of a girl you want to add, you can upload that as your second image. If not, the AI will automatically generate a girl’s photo based on your chosen prompt.
Once both photos are uploaded, paste the copied prompt into the given field. Then, click on the option called “Nano Generator” or “Nano AI Creator.” This tool will process your images and generate a perfectly blended final photo.
After a few seconds, your AI-generated photo will be ready. Zoom in and check the results — you’ll see how realistically the AI has merged both faces. It looks completely natural and well-blended!
Step 4: Save and Download Your Edited Photo
Once your photo looks perfect, you can easily save it to your phone gallery or computer by clicking on the download button. Make sure to store it in high resolution so that it looks crisp when you post it on Instagram or other social platforms.
👉 For more AI photo tools, check out:
Step 5: Try Adding Two Photos Together
If you want to experiment more, try uploading two separate photos — one of yourself and another of a girl. After uploading, paste the same prompt and click on “Nano Generator” again. Wait for the AI to process the photos.
In just a few seconds, you’ll get a new photo where both faces are merged perfectly! The results are usually amazing, with realistic lighting and matching facial tones. Once again, save your final photo and share it on social media to impress your friends.
Final Thoughts
So guys, this is how you can add a girl to any of your photos using AI tools. It’s an easy and fun process that helps you create creative, realistic images in just minutes. Make sure to like this post, subscribe for more tutorials, and let me know in the comments how your AI photo turned out!
Also, if you love experimenting with AI photo editors, check out this detailed guide on best free AI image generators that you can use right now.
Happy editing, and see you in the next tutorial! 🎨📸